Unity OpenXR: Setting Up Meta Quest Controller Profiles
When Meta Quest controller buttons do not fire in Unity, the tempting first move is to blame the InputAction binding. Sometimes that is the problem, but with OpenXR there is an earlier layer worth checking first: the controller interaction profiles.
The Setup Check
Go to:
Project Settings -> XR Plug-in Management -> OpenXR
Then check Enabled Interaction Profiles for every platform target you use.
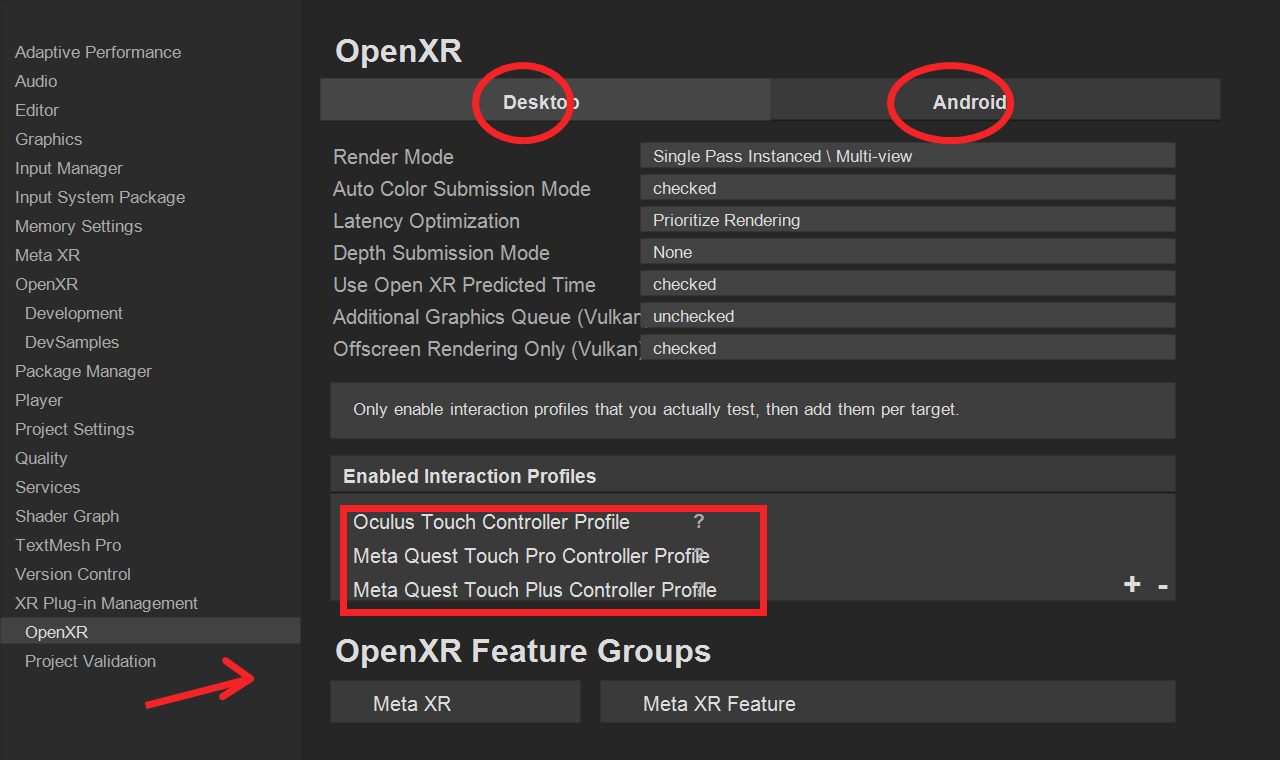
For Quest projects, enable the profiles that match the controllers you actually support:
Oculus Touch Controller Profile: Quest 2 and older Oculus Touch style controllers.Meta Quest Touch Pro Controller Profile: Quest Pro Touch Pro controllers.Meta Quest Touch Plus Controller Profile: Quest 3 and Quest 3S Touch Plus controllers.
You can enable all of them while testing across devices, but for a final build I prefer keeping the list intentional. Extra profiles can let OpenXR remap through a controller layout I did not test.
The important bit is that the tabs at the top matter. Desktop and Android are separate OpenXR settings. If Play Mode is running through Link/Air Link, Unity can use the Desktop settings even when the project is ultimately built for Android. If the Android tab is correct but Desktop is missing the profile, testing in-editor can still look broken.
Profiles And Actions Are Different Problems
The interaction profile tells OpenXR which physical controller layouts the app supports. The Input System action tells Unity which logical control you are listening for.
That means both layers need to line up:
- The OpenXR target has the right controller profile enabled.
- The action has a binding that exists on that controller.
- The binding is in the right control scheme group.
- The action’s interactions do not delay or change when
performedfires.
If you are using a component such as Meta’s ControllerButtonsMapper, remember that it listens to the InputActionReference. If the referenced action never reaches performed, the callback will not run.
Do Not Forget The Control Scheme
In the Input Actions editor, selecting an XR-looking path is not always enough. Check the binding’s Use in control scheme section and make sure XR is enabled for that binding.
For example, this kind of binding should be part of the XR scheme:
<XRController>/primaryButtonIf the binding is not included in the active control scheme, a PlayerInput setup can ignore it even though the path itself looks correct.
Bind Explicitly While Debugging
For debugging, I prefer specific bindings over generic usages:
<XRController>{RightHand}/primaryButton
<XRController>{LeftHand}/primaryButton
<XRController>{RightHand}/secondaryButton
<XRController>{LeftHand}/secondaryButton
<XRController>{RightHand}/triggerPressed
<XRController>{LeftHand}/triggerPressed
Once that works, I might loosen the binding if the use case needs it:
<XRController>/primaryButtonThat catches the primary button on either hand. I avoid broad wildcard bindings for gameplay, because they can catch controls that are not really “buttons” in the way a player expects.
Primary Button, Primary Action, And Touch
These names look similar, but they are not interchangeable.
| Binding | Meaning | Typical Use |
|---|---|---|
primaryButton | The physical primary button is pressed. | Gameplay input, confirm actions, debug logs. |
primaryTouched | The user’s thumb is resting on the button. | Hand pose or controller pose feedback. |
{PrimaryAction} | A generic usage that OpenXR maps through the active profile. | Portable fallback when you do not care about a specific physical button. |
For “press A/X and run code”, primaryButton is usually the clearest choice.
Watch The Action Interaction
Another easy thing to miss is the interaction on the action itself.
If an action has:
Holdthen a quick press may not call performed. The binding can be correct, the profile can be correct, and the callback can still look dead because the action is waiting for a hold threshold.
For a basic button callback, start with no interaction or with a simple Press interaction. Add Hold only when the behavior actually needs hold semantics.
Debug Checklist
When a Quest controller button does not fire:
- Check the OpenXR interaction profile on both Desktop and Android.
- Confirm the action references the action you think it references.
- Remove
Holdwhile testing. - Bind to a concrete control such as
primaryButton. - Use the Input Debugger to see which control changes when you press the physical button.
- Only then wire the callback into gameplay code.
Related
- Unity docs: MetaQuestTouchPlusControllerProfile
Have a question about this note?
Share the note where it fits. X opens with a question draft; LinkedIn shares the article link.